Saturday, September 15, 2012

Create a proxy in WSO2 ESB using admin services.

Do you want to know how to create a proxy in WSO2 ESB without using UI. Here is a sample code
that will help you to understand how to use an admin service to achieve the task.
package org.wso2.test;

import org.apache.axis2.AxisFault;
import org.wso2.carbon.proxyadmin.stub.ProxyServiceAdminProxyAdminException;
import org.wso2.carbon.proxyadmin.stub.ProxyServiceAdminStub;
import org.wso2.carbon.proxyadmin.stub.types.carbon.ProxyData;
import org.wso2.carbon.utils.CarbonUtils;

import java.rmi.RemoteException;

public class TestProxy {

    public static void main(String[] args)
            throws RemoteException, ProxyServiceAdminProxyAdminException {

        String userName = "admin";
        String password = "admin";
        // Add the service URL
        String serviceEndPoint="http://localhost:8281/services/echo" ;
        // Proxy Admin service's endpoing URL
        String endPoint = "https://localhost:9444/services/" +"ProxyServiceAdmin";

        // Set client trust store
        System.setProperty("javax.net.ssl.trustStore", "/media/data/wso2/products/wso2/esb/" +
                                                       "wso2esb-4.5.0/repository/resources/security" +
                                                       "/client-truststore.jks");
        System.setProperty("javax.net.ssl.trustStorePassword", "wso2carbon");
        System.setProperty("javax.net.ssl.trustStoreType","JKS");

        ProxyServiceAdminStub proxyServiceAdminStub = new ProxyServiceAdminStub(endPoint);

        CarbonUtils.setBasicAccessSecurityHeaders(userName, password,
                                                  proxyServiceAdminStub._getServiceClient());

        //Set proxy configuration data
        String[] transport = {"http", "https"};
        ProxyData data = new ProxyData();
        data.setName("TestProxy2");
        data.setWsdlURI("http://localhost:8281/services/echo?wsdl");
        data.setTransports(transport);
        data.setStartOnLoad(true);
        data.setEndpointXML("<endpoint http:="http:" ns="ns" synapse="synapse" ws.apache.org="ws.apache.org" xmlns="\"><address serviceendpoint="serviceendpoint" uri="\">
</address>
</endpoint>");
        data.setEnableSecurity(true);

        proxyServiceAdminStub.addProxy(data);
    }
}


Download complete maven project here

Thursday, July 12, 2012

How to create a Data service from Google Spread sheet


Introduction


Google Spread sheets are popular tool and used in businesses heavily. Imagine a usecase where you need to collect data from various people and then use that data in your applications. Most of the time 5 minute work would be to create a Google Spread sheet and design a form to share among the people to collect the data. Once you have the collected data you may need to use them in your applications. WSO2 Data Services provide you a very convenient way to expose those data as a data service.

Requirements.


1) WSO2 Data Service Server 2.6.3
2) Online Google Spread sheet

Steps.
Starting the server.


Extract Data Services Server and lets consider root folder as <DSS_HOME>.
navigate to <DSS_HOME>/bin folder and in linux run wso2server.sh (If you are in windows use wso2server.bat)
Login to server using browser (default URL : https://localhost:9443)

Creating the Data Service.


Click on add → Data Service → create. ( you will get the following panel to add a name)


  • Create the data source from Google Spread sheet.


 (If you do not have your own one lets use the following online spreadsheet i have created.)

DataSource id gspreadTest
DataSoure TypeGoogle Spread Sheet
Google Spreadsheet URLhttps://docs.google.com/spreadsheet/ccc?key=0AmhfrCQvF530dEFzUlZaUDlsdUM1STJXbVdMRnJKM0E
usernamewso2dss
passwordwso2dss@2012


  • After completing click on Test Connection to verify the data source you have created. If it is successful you should get the following success dialog.


  • Create Query


For the query you need to define following parameters.

ParametervalueDescription
Query IDgetAllExpensesAn unique id to identify the query
Data SourcegspredTestData source we created in previous step
Worksheet no1identification no of the excel working sheet. (from sheet1, sheet2... etc.)
Start Reading from2From which row you are starting reading
Rows to read-1if it is (-1) it will read all the rows. Otherwise define the no of rows need to be read.
Headers availabletrueif yes. it will identify column headers for output mapping. Otherwise you need to define column number.


  • Create output mappings to columns of Google Spread sheet.

click on “Add new output mapping” and fill the for all the columns in the spreadsheet as we are going to extract all of them through this data service.


  • Add Grouped By element : Expenses and Row name : Expense(In the result it will appear by those given names.)

<Expenses xmlns="http://ws.wso2.org/dataservice">
     <Expense>
       <Amount>1000</Amount>
       <Name>Shelan</Name>
       <Type>Transport</Type>
       <TimeStamp>3/13/2012 11:45:09</TimeStamp>
   </Expense>
</Expenses>


  • After adding all of them in the “main Configuration” you can view the added output mappings.


  • Create a operation to Call the query.


  • Then save and click → finish to deploy the data service.
  • Go to Service Management ( Click → List on left panel) and refresh after few seconds to view your deployed service.
  • Click on try it to test you service.


Monday, June 18, 2012

Cassandra GUI 2.0 - Making things a little bit easier

Update (2014 October 31st)

You can download WSO2 Storage server  1.1.0 which ships Cassandra explorer and many interesting tools to manage storages. Please follow the following links for documentation to use Cassandra Explorer.

Download the product
https://docs.wso2.com/display/SS110/Downloading+the+Product

Extract the binary and run the product. (See "Starting the server" after extracting )
https://docs.wso2.com/display/SS110/Running+the+Product

Documentation about Explorer
https://docs.wso2.com/display/SS110/Explore+Cassandra+Cluster

========================================================================

Cassandra GUI evolved from its first version and new version includes bug fixes and enhanced features.

New features.

  • Complete pagination for Row view of explorer
  • Search rows by their names. (Filtered on the fly as you type.)
  • Filtering non displayable data and label them with warnings.

Bug Fixes

  • Remote connection problem
  • Connect to Remote Cassandra server without restarting the server.

Start the Server


Extract the downloaded product and lets refer extracted folder as CARBON_HOME.

go to CARBON_HOME/bin and run sh wso2server.sh (linux) or
wso2server.bat

Log in to the admin console using https://localhost:9443/
default user name and password : admin, admin

Following screen shots include a quick flow on how it works.


1) Click connect to cluster on right hand side panel. Give connection URL and credentials (if there is any) to connect.

eg: URL = localhost:9160,  or  10.100.3.234:

2) After a Successful connection you will be directed to keyspace listing page. Which will include Keyspaces and clickable column family names. Click on a Column Family to Explore data.


3) Row view Page.
After clicking the column family you have landed in the row view page. It includes rows of your column family and a slice of column data as a summary.

You can search, paginate or change no of items to filter your data. Click "view more" to explore a single row.


4) Column family view page will list all the columns in a single row. You can filter the data with column name,value or time stamp. full numbered pagination is available. 


Saturday, May 12, 2012

Cassandra Explorer - GUI for Cassandra

Please go to following url for the newest version.
http://blog.shelan.org/2012/06/cassandra-gui-20-making-things-little.html


WSO2 products can manage a Cassandra Cluster using Cassandra feature.[1]  (No need to follow the instructions to setup cassandra I have added a pre installed version [2])
If you have a Cassandra cluster i am sure you have the problem of viewing the data instantly. Cassandra CLI is one of the tools but it would be easier if it has a nice UI and would more convenient for administrators. Cassandra Explore has been developed to make the things easier for Cassandra users.

Download the Cassandra Feature pre installed WSO2 Carbon Server. [2] . (Until we officially release Cassandra Explorer with Cassandra feature lets use this.)

Extract the downloaded product and lets refer extracted folder as CARBON_HOME.

You have two different options with Cassandra feature.

1. Use internal Cassandra Server .

In this it will start internal Cassandra Server and you can use it to store data.

2. User External Cassandra Cluster.

This option if you already have setup your Cassandra Cluster and you need to view data. You need to
add your Cassandra Clusters details in CARBON_HOME/repository/conf/etc/cassandra-component.xml

Starting Carbon Server

1) If you need to use internal server. go to CARBON_HOME/bin and run sh wso2server.sh (linux) or
wso2server.bat

 If you need to connect to an external cassandra cluster you need to run same wso2server.sh with following parameter

sh wso2server.sh -Ddisable.cassandra.server.startup=true

and log in with default username and password (admin, admin)

List Key Spaces.

Click Cassandra Keyspaces ---> List to list down keyspaces.


Select a Key Space

Select a keyspace from available keyspaces.


Select a Column Family to Explore Data.

Click on Explore icon to view data in a Column Family.


View Data on Column Family.

This will display rows and columns in the Column Family. In a Row you can paginate through Columns. If you need to retrieve a key quickly enter your row ID and click explore row.


View data on a Row

Click on a row link to view data.

You can search  a Name or Value through search Box and will update the results as you type.


[1] http://wso2.org/library/knowledge-base/2012/04/deploy-cassandra-feature-wso2-carbon-product

[2] https://www.dropbox.com/s/m00uodj1ymkpdzb/wso2carbon-4.0.0-SNAPSHOT.zip

Sunday, March 11, 2012

How to change default temporary folder in WSO2 carbon based products

In wso2 carbon based products default temporary folder is {product_home}/tmp.

 If you need to change that location to a different location here is the way to do it.

 You can change the location by changing the locations in start up scripts.

 1) In Linux (/bin/wso2server.sh) change following parameter's location.

 -Djava.io.tmpdir="$CARBON_HOME/tmp"

 2) In Windows (/bin/wso2server.bat) change the following parameter's location.
 -Djava.io.tmpdir="%CARBON_HOME%\tmp"

Monday, March 5, 2012

How to call MySQL stored procedures from WSO2 Data Services Server

 Stored procedures allows you to expose pre defined queries as an api allowing users to consume them in a much faster way.

Requirements.

MySQL Database server
WSO2 Data Service Server (DSS) 2.6.3
MySQL JDBC driver

Note: <DSS_HOME> is the root folder of your unpacked DSS server.

1.) Unpack WSO2 DSS and drop MySQL JDBC driver in <DSS_HOME>/repository/componets/lib folder.
2) Start the server using the start script <DSS_HOME>/bin/wso2server.sh  (In linux or wso2server.bat in windows)

Prepare Database

use following queries to generate a database with a stored procedure. [1]


DROP DATABASE IF EXISTS DATASERVICE_SAMPLE;
CREATE DATABASE DATASERVICE_SAMPLE;
GRANT ALL ON DATASERVICE_SAMPLE.* TO 'dsuser'@'localhost' IDENTIFIED BY 'user123';

USE DATASERVICE_SAMPLE;

DROP TABLE IF EXISTS Employees;

CREATE TABLE Employees(
        employeeNumber INTEGER,
        lastName VARCHAR(50),
        firstName VARCHAR(50),
        extension VARCHAR(10),
        email VARCHAR(100),
        officeCode VARCHAR(10),
        reportsTo INTEGER,
        jobTitle VARCHAR(50) 
);


insert into Employees values (1002,'Murphy','Diane','x5800','dmurphy@classicmodelcars.com','1',null,'President');
insert into Employees values (1056,'Patterson','Mary','x4611','mpatterso@classicmodelcars.com','1',1002,'VP Sales');
insert into Employees values (1076,'Firrelli','Jeff','x9273','jfirrelli@classicmodelcars.com','1',1002,'VP Marketing');
insert into Employees values (1088,'Patterson','William','x4871','wpatterson@classicmodelcars.com','6',1056,'Sales Manager (APAC)');
insert into Employees values (1102,'Bondur','Gerard','x5408','gbondur@classicmodelcars.com','4',1056,'Sale Manager (EMEA)');
insert into Employees values (1143,'Bow','Anthony','x5428','abow@classicmodelcars.com','1',1056,'Sales Manager (NA)');
insert into Employees values (1165,'Jennings','Leslie','x3291','ljennings@classicmodelcars.com','1',1143,'Sales Rep');

DROP PROCEDURE If EXISTS getEmployee;
CREATE PROCEDURE getEmployee(empNo INTEGER) SELECT employeeNumber,lastName,firstName,email FROM Employees where employeeNumber = empNo;
 Create Data Service.

1) click on DataService -----> Create

2) Add new Data Source.


3) Click next and Add new Query.


Here ? denotes the parameter required for the SQL query.

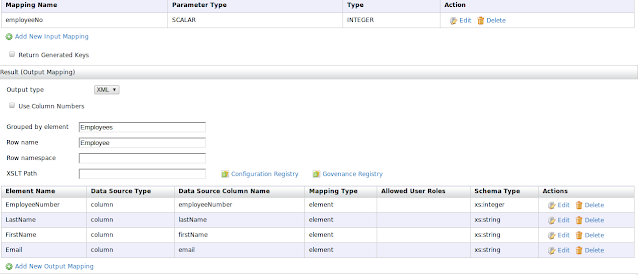
4) Add input parameter mapping 

Since we need to have an input parameter for the Data Service lets define it.


5) Add output Mapping.

There are elements in the output result we need to map. There are four output Mappings we need to define and i following screenshot shows adding one of them.


After adding all of them, Here how it looks like.


6) Click save and go to next page to add new operation. Click on "Add query params as operation params" to add input parameters for operation.


7) Click save and then click finish to deploy the Data Service. After few seconds refresh the web services list to view newly added Data Service.

8) Click on "Try this Service" to test the service. And then test your StoredProcedure exposed as a data service through WSO2 Data Services Server.

(here i have used 1002 as the employeeNo)


Thursday, March 1, 2012

Adding JMS transport for WSO2 Data Services Server

Pre requisites


1) Configuring JMS transport.
  • After extracting Data Services Binary navigate to {DSS-HOME}/repository/conf
  • Open axis2.xml in your editor
  • Uncomment the following section
for Transport Listner
 <!--Uncomment this and configure as appropriate for JMS transport support, after setting up your JMS environment (e.g. ActiveMQ)-->
    <transportReceiver name="jms" class="org.apache.axis2.transport.jms.JMSListener">
        <parameter name="myTopicConnectionFactory" locked="false">
         <parameter name="java.naming.factory.initial" locked="false">org.apache.activemq.jndi.ActiveMQInitialContextFactory</parameter>
         <parameter name="java.naming.provider.url" locked="false">tcp://localhost:61616</parameter>
         <parameter name="transport.jms.ConnectionFactoryJNDIName" locked="false">TopicConnectionFactory</parameter>
  <parameter name="transport.jms.ConnectionFactoryType" locked="false">topic</parameter>
        </parameter>

        <parameter name="myQueueConnectionFactory" locked="false">
         <parameter name="java.naming.factory.initial" locked="false">org.apache.activemq.jndi.ActiveMQInitialContextFactory</parameter>
         <parameter name="java.naming.provider.url" locked="false">tcp://localhost:61616</parameter>
         <parameter name="transport.jms.ConnectionFactoryJNDIName" locked="false">QueueConnectionFactory</parameter>
  <parameter name="transport.jms.ConnectionFactoryType" locked="false">queue</parameter>
        </parameter>

        <parameter name="default" locked="false">
         <parameter name="java.naming.factory.initial" locked="false">org.apache.activemq.jndi.ActiveMQInitialContextFactory</parameter>
         <parameter name="java.naming.provider.url" locked="false">tcp://localhost:61616</parameter>
         <parameter name="transport.jms.ConnectionFactoryJNDIName" locked="false">QueueConnectionFactory</parameter>
  <parameter name="transport.jms.ConnectionFactoryType" locked="false">queue</parameter>
        </parameter>
    </transportReceiver>
For Transport Sender
 <!-- uncomment this and configure to use connection pools for sending messages-->
     <transportSender name="jms" class="org.apache.axis2.transport.jms.JMSSender"/>
  • Add the required jars to <DSS_HOME>/repository/components/lib folder. 
  • Start ActiveMQ using command "sh <ActiveMQ_HOME>/bin/activemq start"

You can explore your ActiveMQ queues for services using JConsole. ( Type Jconsole in linux shell.)

Friday, February 24, 2012

Big Data : A Quick introduction

What is Big data?

This is one of the buzz words in today's world and has gained the attention of many industries. By looking at the name one might think it as data in "BIG" format. But there is much more than that. Today the rate of data generation is so huge and there are several dimensions that data evolves.

Big data spans three dimensions: Volume, Velocity and Variety.


"
Volume – Big data comes in one size: large. Enterprises are awash with data, easily amassing terabytes and even petabytes of information.

Velocity – Often time-sensitive, big data must be used as it is streaming in to the enterprise in order to maximize its value to the business.

Variety – Big data extends beyond structured data, including unstructured data of all varieties: text, audio, video, click streams, log files and more."
[1]

The most interesting challenge as well as the opportunity comes for companies who deals with Big data. You cannot rely on conventional method to store, load and analyse big data. If the companies do not carefully model their big data problems using all 3 mentioned dimensions the friction they will have in the future to growth will be significant. It is no doubt that huge reinvestment will be needed to re design the whole system to meet the requirements.

Here are some articles which discuss about those issues in big data [2] [3]

Sunday, February 19, 2012

How to kill a process running on a known port


If you know a process running on a specific port and need to kill the process ?
here are the steps.
1) Find the process ID. (Here which runs on 9443)
?
1
2
3
4
5
fuser -n tcp 9443
or
lsof -w -n -i tcp:9443
Then you have the process ID. Kill the process with (Here ID = 6147)
?
1
kill -9 6147